

Lifestyle: Four Ingredient No-Churn Chocolate Ice Cream with Askanya Chocolate
- Oct 28, 2018
- 3 min read


After being sold out for months, there is a new shipment of Askanya Chocolates in from Haiti (yay!) available in the Soul and Story shop, and since I'm always looking for excuses to consume Askanya chocolate, I figured why not try to make ice cream? Did you know you don't need an ice cream maker to make ice cream? So with just 4 ingredients I whipped up the most creamy and decadent chocolate ice cream. This is a must try recipe! It's simple to make and all you need are items you already have around the house. I had so much fun making this!
Keep reading for recipe, instructions and pictures.
Note: As with anything, good ingredients are essential to the taste and quality of the finished product. Hence why we used Askanya Chocolates, it's "real" chocolate, it doesn't contain the additives and preservatives of much of the chocolate we find on the market. It's bean to bar made in Haiti, meaning the ingredients aren't shuffled from one country to another resulting in the loss of bean quality.
I also used organic cocao powder from a collective of cocoa farmers in Bolivia called El Ceibo. Processed in Bolivia without additives thus preserving taste and quality. By choosing these ingredients we are supporting the local farmers and producers at the point of origin, many of whom are intentionally cut out of their fair share of the lucrative profits seen by the large chocolate companies.
Ingredients:
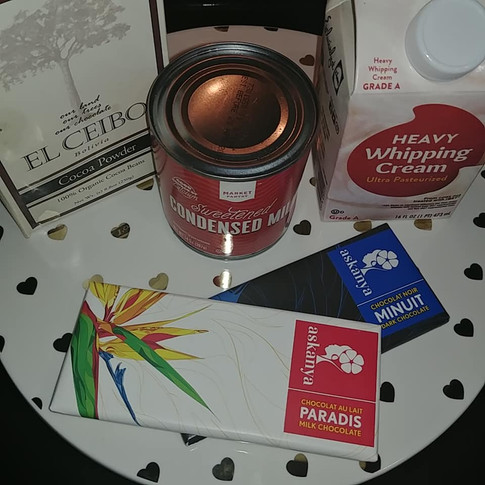
1 carton of heavy cream (see size pictured)
1 can of sweetened condensed milk
1 cup of cocoa powder
2 full-size bars of Askanya Chocolate and 2 mini bars of Askanya Chocolate (for garnish)
Note: I used Pardis (milk chocolate with cacao butter) and Minut (60% dark chocolate with vanilla bean)
Tools:
- Stand mixer (or hand mixer)
- Container to hold ice cream
Servings:
7-10 people (2 scoops each); 4-6 people (3 scoops each). If you're doing a tasting you could serve about 16-20 people at one scoop each.
Prep:
I placed my mixing bowl in the freezer for several hours before I started to make the ice cream so it can be nice and chilled. Also the whisk attachment as well.
Chop up the full size bars chocolate bars into chunk sizes
- I used the "Africa" multi-purpose cutting board, it provides a solid no-slip/slide surface for chopping (see picture).


Instructions:
- Whip heavy cream until peaks form (takes 6-8 minutes)
Note: If you are using a stand mixer, you can chop the chocolate while the cream is whipping up
- Add cocoa powder and and sweetened condensed milk to the whipped cream
-Fold ingredients together (I also used a wooden spoon to ensure everything was mixed together well)
-Add chocolate chunks, so that the chocolate chunks are evenly dispersed throughout the mixture
- Pour mixture into container (can use a baking pan or other container that is freezer safe)
Note: If your container is shallow, it will take less time for the ice cream to freeze. Deeper containers will take a bit longer.
Let ice cream remain in the freezer for at least six hours, overnight (10-12) hours is even better. Don't serve until the ice cream is solid all the way through.
And, that's it! Serve as usual. I garnished with whip cream and a mini Askanya chocolate bar (I'm extra)!

Modifications:
I think you could get away with adding another 1/3 carton of heavy cream to the recipe if you want a bit more servings, without adjusting the other ingredients.
Or, if you're short on cocoa powder even 3/4 cup of cocoa powder will do the job.
A splash of real vanilla extract and a bit of pink Himalayan sea salt would also be delicious.
If you try this recipe, please send pictures or tag us on Instagram and/or Facebook @soulandstoryinc.com
Enjoy! <3


Comments